


 DSDTs ("Differentiated System Description Tables") are configuration files that tell Mac OS X how to use your Hackintosh's motherboard, without the need for extra kexts and drivers. For desktop computers, a DSDT will make it a lot easier to enable sleep mode on your Hackintosh; it may also fix bootup problems related to your CPU, and enable HDMI audio. For laptop computers, meanwhile, DSDTs are even more useful. A good DSDT will fix a huge number of laptop-related issues in Mac OS X, including problems regarding audio, battery, graphics, USB, WiFi, fan control, and more. In this guide, we'll show you how to edit your own DSDT, by applying patches with the DSDT editing tool MaciASL.
LAST UPDATED: February 14, 2016
NOTE: Another important configuration file to keep in mind is the SSDT, or "Secondary System Description Table." As the name implies, SSDTs are your computer's "secondary" configuration files, while DSDTs are your computer's main configuration file. In general, SSDTs and DSDTs work in the same way: to get your Hackintosh running at 100%, you will oftentimes have to patch both (this is especially true for laptops). For simplicity's sake, however, we will only be using the name "DSDT" within this guide.
Introduction - Do you really need to make your own DSDT?
 First things first: does your Hackintosh actually need a DSDT? In particular, this may depend on whether you own a desktop or a laptop.
- Desktop computers: If your desktop computer uses a motherboard manufactured in 2014 or newer (i.e. made for Intel Haswell processors), you don't need to use a DSDT file. Motherboards made by Gigabyte from 2010 onwards don't require DSDTs, either. And even if your computer uses an older, non-Gigabyte motherboard, you can still usually avoid using a DSDT by patching your BIOS (for more information, check out our ASUS motherboard guide). However, DSDTs can still be useful in certain situations: as previously mentioned, you will always need a custom-edited DSDT if you want to enable HDMI audio. Plus, certain motherboard models experience random glitches that can only be fixed through a custom-edited DSDT. In these cases, you'll probably still want to make your own.
- Laptop computers: Pretty much any Hackintosh laptop will benefit from using a custom-edited DSDT. Installing Mac OS X on a laptop computer is an extremely tricky process, with many more possible points of failure than a desktop computer. Audio compatibility tends to be more spotty. WiFi cards rarely ever cooperate. CPU power management becomes more difficult. And so on. Essentially, if you have the option, you should always try to edit your own DSDT (or find a pre-edited one) for a Hackintosh laptop.
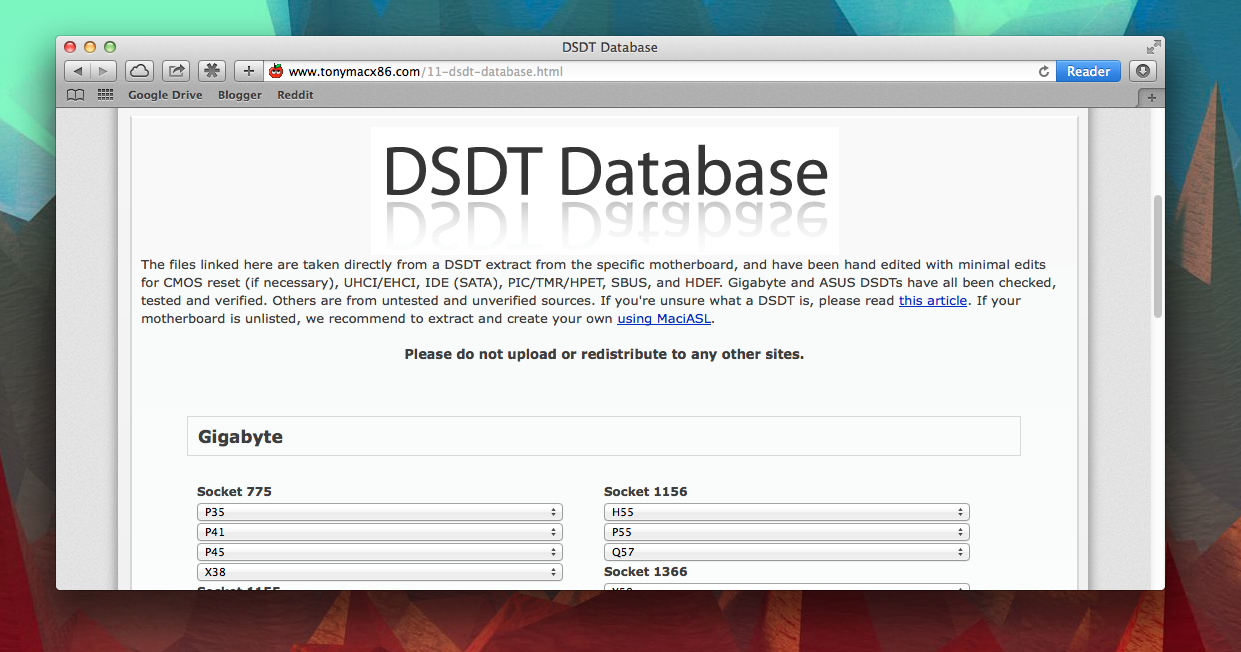
If your Hackintosh actually needs a DSDT, you now have two main options. Your easiest option would be to download a pre-edited DSDT from the internet. For instance, there are many pre-edited DSDTs available for download in tonymacx86's DSDT database (although most of the DSDTs are designed for older Gigabyte motherboards). There are also multiple DSDT files available for download in the the DSDT section of OSX86.net. If neither option works, you can also simply resort to Google.
 However, using a pre-edited DSDT for your Hackintosh has several disadvantages, especially for laptops:
- DSDT files are specific to certain BIOS versions. For example, if your motherboard BIOS is version F7, it won't work with a DSDT designed for version F5. (To find out the BIOS version of your Gigabyte motherboard, check out this guide.) While this isn't a big problem for the tonymacx86 DSDT database, which usually features multiple DSDTs for each motherboard, things get a lot trickier once you start downloading DSDTs from other online sources.
- DSDTs are sometimes very hardware-specific. This mainly applies to laptops: many laptop DSDTs are specifically edited to work with certain CPUs, WiFi chips, ethernet chips, etc. However, actual laptop product lines feature dozens of slightly different models, each with slightly different hardware. If you want to use a pre-edited laptop DSDT from the internet, it's very difficult to make sure you have the exact same hardware as the person who originally edited it. Oftentimes, these DSDTs simply won't work right.
If using a pre-edited DSDT is impractical for your Hackintosh, then you'll have to resort to the second option: editing your own DSDT with "patches".
Where to get patches
 Theoretically, you could manually edit your own computer's DSDT, with no outside help. However, this is extremely difficult. Instead, your best option is to use pre-made "patches" to edit your DSDT. A "patch" is a text file that contains pre-made DSDT edits; some patches are only intended to work with a specific motherboard/laptop model, while other patches work with almost all computers in general. Here are a few common sources for Hackintosh patches:
- Olarila.com - This is an older source for patches. Most of the patches here are just basic DSDT edits, designed for specific motherboard/laptop models. If you happen to own a rather old (i.e. pre-2012) motherboard or laptop, check this place out. These patch files have to be individually downloaded.
- MacMan (tonymacx86) - These are the basic patches that MacMan used to create the pre-edited DSDTs in tonymacx86's DSDT database. If the tonymacx86 database doesn't have a pre-edited DSDT that works with your motherboard's BIOS version, you can just personally make your own DSDT with these patches instead. These patch files cannot be individually downloaded; they can only be accessed via the "Sources" feature in MaciASL (we'll talk more about this feature later).
- PJALM (Sourceforge) - This is a major source for "general" patches, written by PJALM from tonymacx86. Most of the patches available here are designed to fix common Hackintosh glitches (particularly for desktop computers). There are also multiple patches available for specific Gigabyte, ASRock, MSI, and Zotac motherboards. These patch files cannot be individually downloaded; they can only be accessed via the "Sources" feature in MaciASL.
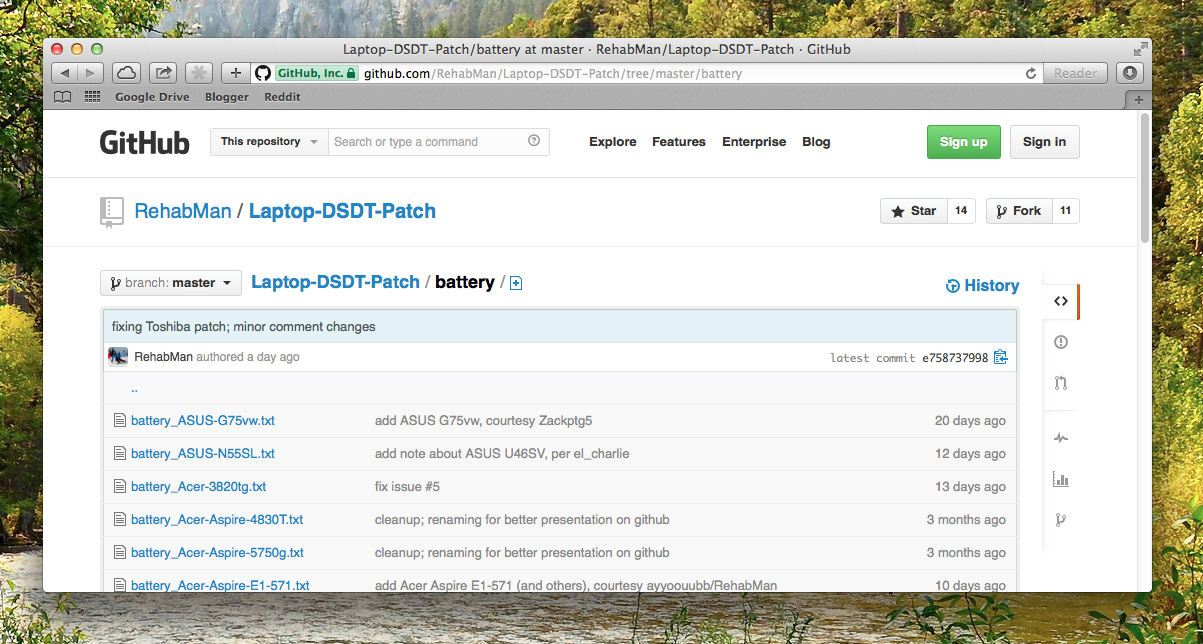
- RehabMan (Github) - This is the main source for laptop patches, written by Rehabman from tonymacx86. Most of the patches from here are designed to fix common laptop-specific issues. These patches can be individually downloaded; alternatively, you can access these files via the "Sources" feature in MaciASL (check the README.txt in each section of Rehabman's Github for details).
- Toleda (Github) - This is the main source for patches that enable HDMI audio. For specific details on how to enable HDMI audio with these patches, check out the HDMI audio section of tonymacx86. These patch files can be individually downloaded; alternatively, you can access these files via the "Sources" feature in MaciASL (through these links).
To actually use these patches, you'll have to get a DSDT editing tool-- the editor will automatically read each patch, and apply the necessary edits. For this guide, we're going to do this with MaciASL.
How to use patches to make your own DSDT
NOTE: For the purposes of this guide, we'll assume that you have already installed OS X El Capitan (or newer) on your Hackintosh. If you have not yet installed El Capitan, check out our installation guides section.
1. Extract a clean copy of your computer's DSDT
The first step in the DSDT patching process is to extract a "clean" copy of the DSDT from your Hackintosh. Fortunately, this is relatively easy to do, assuming your computer boots OS X using the new Clover bootloader.
Restart your computer. Once you reach the Clover boot screen, press the F4 key on your keyboard. When you press this key, Clover will automatically save a clean copy of your computer's DSDT to your EFI partition. (On some keyboards, you might have to press the Fn key in combination with F4.)
 Next, boot into OS X. Since Clover saved your computer's DSDT onto your EFI partition, which is hidden by default when OS X boots, you will have to mount the partition manually. Check out our guide on EFI partitions for details on doing that.
Once your EFI partition is mounted, open the partition, and go to EFI -> CLOVER -> ACPI -> origin. Inside this folder, you'll find a clean copy of your computer's DSDT, named "DSDT.aml."
 Copy this DSDT file to somewhere easily accessible on your computer (e.g. your desktop), and proceed to the next step.
NOTE: The "origin" folder also contains clean copies of other configuration files for your computer, including your SSDT files.
2. Disassemble the DSDT
Currently, your DSDT file is still in its "compiled" format. Before you can start editing and patching it, you will have to "disassemble" the DSDT into its source code. You can do this with the command line program iASL, which you can download from the link below:
DOWNLOAD: iASL.zip
Open the ZIP file that you've downloaded; you'll get a file called "iasl," with no file extension. To use iASL, you must first navigate to the base of your computer's main hard drive partition, and go to usr -> bin. (To be able to view the "usr" folder, you have to enable the showing of hidden files in OS X.)
This "bin" folder is where OS X and other Unix-based operating systems usually keep their command line programs. Copy the iasl file into this "bin" folder, and enter your system password when asked.
 Next, open the Terminal app in OS X (located in Application -> Utilities). In Terminal, type the following commands:
cd "folder"
iasl -da -dl *.aml
Replace "folder" with wherever you placed your clean DSDT in Step 1. For instance, if you placed your DSDT on your desktop, and your OS X user account was named "pizza", you would enter: cd "/Users/pizza/Desktop"
 This will disassemble the DSDT from an AML (compiled) file into a DSL (source) file. Now, you can finally open and patch your DSDT within an appropriate DSDT editing tool.
NOTE: Technically, it's possible to open a compiled version of your DSDT file directly within a DSDT editing tool, without disassembling it. However, this increases the likelihood of disassembly errors.
3. Open the DSDT within MaciASL
Once you have disassembled a clean copy of your computer's DSDT, you can now begin the patching process. To do this, download MaciASL.

Once your EFI partition is mounted, open the partition, and go to EFI -> CLOVER -> ACPI -> origin. Inside this folder, you'll find a clean copy of your computer's DSDT, named "DSDT.aml."

NOTE: The "origin" folder also contains clean copies of other configuration files for your computer, including your SSDT files.
2. Disassemble the DSDT
Currently, your DSDT file is still in its "compiled" format. Before you can start editing and patching it, you will have to "disassemble" the DSDT into its source code. You can do this with the command line program iASL, which you can download from the link below:
DOWNLOAD: iASL.zip
Open the ZIP file that you've downloaded; you'll get a file called "iasl," with no file extension. To use iASL, you must first navigate to the base of your computer's main hard drive partition, and go to usr -> bin. (To be able to view the "usr" folder, you have to enable the showing of hidden files in OS X.)
This "bin" folder is where OS X and other Unix-based operating systems usually keep their command line programs. Copy the iasl file into this "bin" folder, and enter your system password when asked.

cd "folder"
iasl -da -dl *.aml
Replace "folder" with wherever you placed your clean DSDT in Step 1. For instance, if you placed your DSDT on your desktop, and your OS X user account was named "pizza", you would enter: cd "/Users/pizza/Desktop"

NOTE: Technically, it's possible to open a compiled version of your DSDT file directly within a DSDT editing tool, without disassembling it. However, this increases the likelihood of disassembly errors.
3. Open the DSDT within MaciASL
Once you have disassembled a clean copy of your computer's DSDT, you can now begin the patching process. To do this, download MaciASL.
DOWNLOAD: MaciASL
In the past, we've used other DSDT editing tools, such as the appropriately-named DSDT Editor. These days, however, MaciASL is the most advanced and most convenient DSDT editing tool out there.

Once you've downloaded the app, open your disassembled DSDT (the DSL file) with MaciASL (it should be the default option).
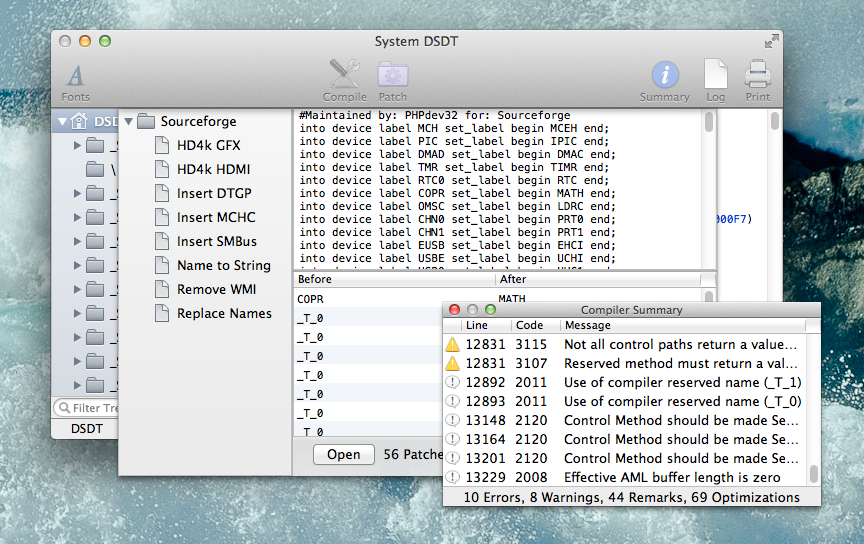
4. Add patch sources to MaciASL
Next, click MaciASL->Preferences in the upper left-hand corner of your monitor. A preferences screen will pop up. From there, choose "ACPI 5.0" for your compiler option.

Now, you will need to add "patch sources", from which you can download patches to edit your clean DSDT. This "Sources" screen in MaciASL is one of the most useful features in the entire app. Look back on the "How to get patches" section of this guide, and choose whichever patch sources are best for your particular computer. You can add each source by clicking the "+" button in the upper-right hand corner of the "Sources" screen (it doesn't matter what you name them).

5. Patch your DSDT
Once you're done, close the preferences screen and click the purple "Patch" button at the top of the screen. A new screen will drop down-- in the left column of this screen, you will see all of the available patches that you can use to edit your clean DSDT. Click on whichever patch you want to use. Then, click "Apply". Wait until the text boxes on the screen became blank; once that's done, click "Close".

Click the "Compile" button on the top of the screen. A "Compiler Summary" screen will pop up. If the patching process works properly, then there should be no errors (though they may still be warnings, remarks, and optimizations). You have now successfully patched your DSDT!


READ MORE: [Guide] Patching LAPTOP DSDT/SSDTs [tonymacx86]