


 Intel recently released Ivy Bridge, the successor to their Sandy Bridge line of processors. There aren't any Macs that use Ivy Bridge processors yet, which means that Mac OS X doesn't natively support the chipset. However, you can still install Mac OS X on a PC using an Ivy Bridge processor, by using the tool Bridge Helper (along with some hackwork in the Terminal).
UPDATE (July 26, 2012): This method is outdated, because Mac OS X Lion 10.7.5 and all versions OS X Mountain Lion now support Ivy Bridge natively. To install Mac OS X on your Ivy Bridge computer, simply follow any of our normal Mac OS X installation guides.
Before We Start
 Ivy Bridge processors have model numbers that are higher than 3000 (for instance, the i5-3450). To install Mac OS X Lion on an Ivy Bridge Hackintosh, you must already own a real Mac or an additional Hackintosh. This is because Unibeast (the tool we're using to install Lion) is a Mac app.
 In the past, you could skip over this requirement by installing Mac OS X Snow Leopard on your Hackintosh, and then updating to Mac OS X Lion, but unfortunately, Snow Leopard doesn't work with Ivy Bridge.
Some Ivy Bridge processors use HD 4000 integrated graphics, which are supported by Mac OS X. Other Ivy Bridge processors use HD 2500 graphics, which don't work. If your computer has HD 2500 graphics, you will have to buy a separate graphics card for your Hackintosh. To find out whether your Intel processor uses HD 2500 or 4000, you can Google the model of your processor. For example, if I search "i5-3570K" on Google, the first result is Intel's official page for the Intel Core i5-3570K. According to the "Graphics Specifications" section of that page, the i5-3570K processor uses "Intel® HD Graphics 4000".
Other Requirements
- Unibeast (Free): Unibeast is a Mac program that modifies the official Mac OS X Lion installer, and writes it onto a USB drive. You can then use this Unibeast USB drive to run the Mac OS X Lion installer on a PC.
- Bridge Helper (Free): Bridge Helper is a Mac program that modifies your Unibeast USB drive, so that it can boot the Mac OS X Installer on an Ivy Bridge Hackintosh.
- Another Hackintosh or a real Mac: Unibeast is a Mac app, so you need a computer with Mac OS X to run it. Read the "Before We Start" section above for more info.
- Mac OS X Lion ($30 or $70): The method used by this guide requires that you have a copy of the Lion installer app ($30) from the Mac App Store, or in the Lion USB Thumb Drive ($70) sold by Apple. The Mac App Store is available in Mac OS X version 10.6.6 or higher.
- An empty USB drive (8 GB or larger): The USB drive used for Unibeast must be at least 8 GB in size. Since Unibeast will erase all of the files on your USB drive, make sure to back up its contents first. You can reuse this USB drive for normal stuff after you finish installing Lion.
- Multibeast Lion Edition (Free): Multibeast is a collection of kext files that your Hackintosh will need to run properly, after the initial installation. Download it onto a USB drive. Be sure to download the Lion edition, not the Snow Leopard edition.
1. Run Unibeast
On your real Mac, additional Hackintosh, or virtual machine, boot into Mac OS X and run Unibeast on your USB drive. Check out Steps 1-2 of our Lion installation guide for more details.
Be sure to remember the name of your Unibeast USB drive (in the screenshot below, my USB drive is called "LION"). You'll need it for Step 4 of this guide.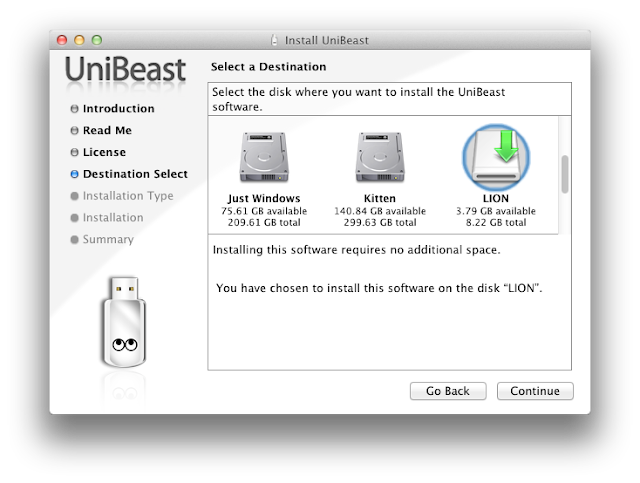
2. Run Bridge HelperBe sure to remember the name of your Unibeast USB drive (in the screenshot below, my USB drive is called "LION"). You'll need it for Step 4 of this guide.

Once you've run Unibeast for your USB drive, run Bridge Helper. On the "Select a Destination" page for Bridge Helper, choose your USB drive, then install. This will replace the standard kernel on the Unibeast USB drive with a modified kernel that works on Ivy Bridge processors. The kernel is an important system file that helps Mac OS X communicate with the hardware on your computer.

Next, you'll need to set the appropriate BIOS settings for your computer, and then actually install Mac OS X Lion. Check out Steps 3-6 on our Lion installation guide for more details.
When installing Mac OS X Lion, be sure to remember the name of the hard drive partition that you're installing Lion on. You'll need this information for Step 4 of this guide.

4. Replace the kernel
When you install Mac OS X Lion on your Ivy Bridge Hackintosh initially, Lion will be using the standard kernel, which doesn't work with your processor. This means that your Lion installation will be unbootable. Not even your Unibeast USB drive will be able to boot it. To fix this, you have to delete the standard kernel currently located in your Lion installation, and replace it will the modified kernel located on your Unibeast USB drive.
Before you do this, make sure that you remember the name of the hard drive that Lion is installed on, and the name of your Unibeast USB drive. Plug your Unibeast USB drive into your Hackintosh, and restart your computer. Once you reach the Unibeast boot menu, boot into the Mac OS X Lion installer. From there, go to Utilities->Terminal in the top menu bar.

rm /Volumes/"Name of hard drive"/mach_kernel
Replace "Name of hard drive" with the actual name of the hard drive that Lion is installed on. Keep the quotation marks in the command. This command removes the standard kernel from the hard drive ("rm" stands for "remove").
Next, enter this command:
cp /Volumes/"Name of USB drive"/mach_kernel /Volumes/"Name of hard drive"/
Replace "Name of USB drive" with the actual name of your Unibeast USB drive, and replace "Name of hard drive" with the actual name of your hard drive. Again, keep the quotation marks in the command. This copies the modified kernel from your USB drive to your hard drive ("cp" stands for "copy").
Once this is done, restart your computer. You will be able to boot your Lion installation with Unibeast, from the Unibeast boot screen. From here, you can run post-installation tools like Multibeast, so Mac OS X Lion will run at full functionality. Check out Steps 7-8 of our Lion installation guide for more details.